up lại lần nữa xem sao. có khi bị trục trặc trong giai đoạn up không?
đã ai cài đc android lên máy này chưa nhỉ?
Cảnh à, anh dùng bản FDom thấy hình như chưa ổn lắm hay treo máy lắm, có lẽ do nặng quá và đặc biệt là Pin ngốn kinh khủng. Có lẽ buổi off đầu năm chạy thử bản Qtopia mới xem thế nào. Anh đang dowload bản **android
**
hi vọng khi đó e có thể up được.
Tết nhất đến đâu rồi, ngày nào lên Hà Nội.
Gửi bác dragon_tudvn
Em được tặng cái máy này nhưng ko biết Voọc nên phiền bác giúp em cài đặt để dùng wifi và GPS giống bác được ko?
Nếu bác rảnh mời bác cafe anh em giao lưu và giúp em vụ này nhé!
OK bác! E cũng thấy bản này lỗi nhiều nên dùng tạm Qtopia rồi. E đang tranh thủ nghiên cứu cài thằng Android mà sợ ko kịp, tết về bận rộn lại nhậu nhẹt suốt. Đầu năm anh em gặp nhau rồi nghiên cứu thêm. hy vọng sẽ có anh em nào báo kết quả ![]()
Hình như máy của bạn box có kèm cái túi và stylus chứ ko phải cái bút laser nhỉ ( bản băng tần 900). Mấy con đó up Qtopia có lúc bị mất tiếng, up lại chắc sẽ được bạn ạ.
Con này hàng xuất xứ từ đâu vậy các bác, e tìm kg ra thông tin.
Đây là dự án phát triển dòng điện thoại mã nguồn mở - Free soft và theo mình tìm hiểu thì hãng này là của Đài Loan (hi vọng tiếng anh của mình đúng)
OK, khi nào lên thì Alo nhé, Có một đồng chí bên TT vừa PM kêu hôm nào Off đầu năm thì tham gia vì vừa lấy được 01 chú, kakakaka, Cảnh đấu giá cái bút của Cảnh đi cảnh ơi.
Chúc ăn tết vui vẻ và không quên nhiệm vụ.
Em cũng vừa mua 1 bé Openmoko neo FreeRunner xong :D, ai hưỡng dẫn em cách up room với . Kết nối usb nó báo là, làm thử mấy cách = chọn file linux.inf vậy mà cũng ko đc. Bé này sài khó quá ta ( em sài windows xp ). Bác nào rảnh giúp em tận tình với.
Bé này gọi điện nghe tiếng người ta nói bé quá à \m/, ko nghe thấy gì lúc đi lên trên hò gươm coi pháo hoa huhu >:P
http://www.handheld.com.vn/forum/attachment.php?attachmentid=15477&stc=1&d=1232914490
Khỏi đấu đi bác, cái đó em tặng bác đầu năm lấy lộc nhé - vừa về nhà còn tìm được luôn cả hộp bút bằng kim loại ( và, hình như còn bộ pi dự phòng).
Đầu năm bác Phương tổ chức buổi off nhé, e cũng xin tham gia luôn:)
E có ý kiến thế này, anh em đi off mang theo lap, e quen cu em dùng win, e dùng mac, chắc sẽ có ai đó dùng linux… trước mắt anh em trao đổi nhau cách up rom và giao tiếp Openmoko ↔ PC/mac đã, còn chuyện các bản flash khác chắc sau tết mới nghiên cứu được bác ạ. Tết này định nghiên cứu tí ti bản Android mà say xỉn suốt, chịu bác ạ:D
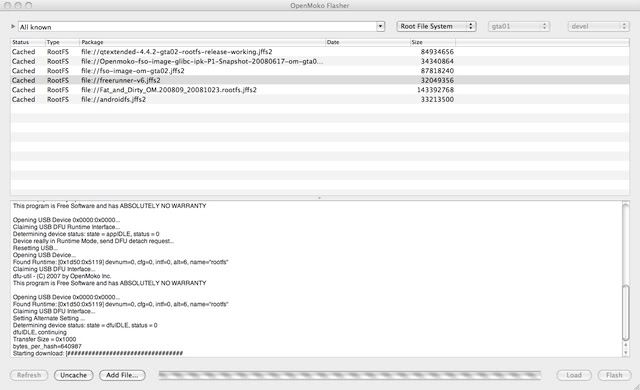
Hôm nay ở nhà trực tết hướng dẫn sơ sơ anh em dùng Openmoko Flasher để up rom từ MAC nhé:
Sau 2 tuần nghiên cứu, sử dụng và up một số bản rom cho chú Neo này, mình viết bài hướng dẫn sử dụng tool " Openmoko Flasher" để Up rom cho Neo trên mac Os. Up rom từ Window và linux mình sẽ viết trong một dịp khác.
A - Công cụ và các file cẩn chuẩn bị:
- Openmoko Flasher: download tại đây hoặc
- Kernel and RootFS:
Mình đưa ra đây 2 bản rom mà mình đã test là:
- Qtopia của Nokia Team: Rootfs và kernel ( bản 4.4.2 đã fixed 1 số lỗi:
- FDOM: RootFS and Kernel
( lưu ý: nếu trước đó cài bản khác bạn đã up bản kernel mới hơn thì phải up lại đúng bản Kernel tháng 9.2008 mà mình đã đưa links trên)
B- Sử dụng công cụ Openmoko Flasher:
- Giao diện Openmoko flasher
http://i143.photobucket.com/albums/r160/dragon_tudvn/giaodien.jpg?t=1233050798 - Sử dụng OpenMoko Flasher:
- mở chương trình
- Ở thanh menu ngang trên, bên trái chọn " all Known" để mở tất cả các kernel và rootfs đã từng mở hoặc đã added, bên phải chọn tương ứng kernel hoặc root file system khi muốn add hoặc flash tươg ứng rootfs và kernel.
http://i143.photobucket.com/albums/r160/dragon_tudvn/menutren.jpg?t=1233052432 - Chọn Root file system → chọn add file → trong cửa sổ browser chọn đường dẫn đến file Rootfs mà mình định up
- Chọn kernel → add file → tương tự.
http://i143.photobucket.com/albums/r160/dragon_tudvn/menuduoi.jpg?t=1233052665 - Up kernel và Rootfs ( cái nào trước cũng được, lưu ý up rootfs và kernel tương ứng- cái này tham khảo trên web mà bạn down kernel và rootfs này về). Cách up rootfs và kernel giống hệt nhau, kernel mất khoảng vài chục giây, rootfs thì vài chục phút.
- Chọn kernel hoặc rootfs mà bạn muốn up
- klick “Flash”
- đợi vài giây, máy báo lỗi " Flashing falled! Try to unplug/replug the USB cable…" ( quá trình flash bị lỗi. Hãy rút và cắm lại cable USB và thư lại - tốt nhất là rút cả đầu Openmoko và đầu Mac).
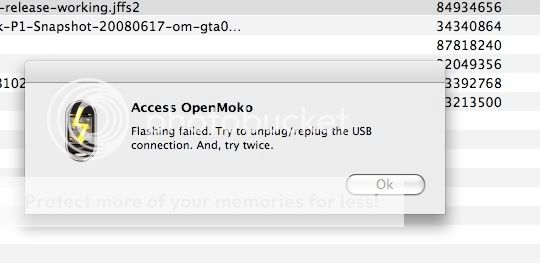
- Klick lại “flash” và đợi quá trình hoàn thành.
Sau khi flash xong cả flash và kernel, khởi động lại chú openmoko và đợi xem thành quả mới
Cảm ơn bác đã hưỡng dẫn, đầu năm tết offline 1 lần đi bác ơi. Nhà em ko có Laptop bác ạ, mà nhà em có con PC, nưng mà sài Windows XP :-s, ko biết có up rom đc cho em này ko huhu. À em xin góp 1 bài về cài Android của Google vào Neo FreeRunner. Em xem trên google tình cờ thôi và thấy chủ video cài Android rồi cho cái link hưỡng dẫn. Mời bác dragon xem và giúp anh em Handheld
I got Android working (as far as it goes) on my Freerunner using Sean McNeil’s kernel and filesystem images.1 These instructions are intended for the average Ubuntu users who wants to see the magic of Android on his/her phone with as little futzing about as possible.
Step 1: Partition your MicroSD card
You need to put a FAT (DOS) partition and an ext2 (or ext3) partition on your MicroSD card in order for Android to boot properly. If it’s possible to do this by plugging your Freerunner into USB, I don’t know how. So you will need some other way of reading your MicroSD card with your PC, for example a MicroSD to SD adapter (if your PC has an SD card reader built in) or a MicroSD to USB adapter. Once you have one of these…
- Insert your MicroSD card into your card reader, and your card reader into your PC.
- If there is a filesystem on your MicroSD card already, it may auto-mount. You must unmount the drive(s) on the card before proceeding. You can do this either through Nautilus (right-click the drive and click “Unmount”) or from the command prompt:sudo umount /path/to/disk/2
Partitions (old or new) may remount themselves after you add or remove them using fdisk (below). If so, you will have to unmount those as well.
- Run fdisk
: sudo fdisk /dev/[device number]
- Enter “p” to display existing partitions and their sizes.
- For each existing partition, enter “d” and then the partition number to delete it.
- Enter “p” again to make sure there are no partitions left on the card, and note the total number of cylinders on the card.
- Create the first partition: enter “n” (new partition), then “p” (for a primary partition), then “1″ (for the first partition), then “1″ (start at the first cylinder), then enter half of the total number of cylinders (to make the first partition half the size of the card).
- Create the second partition:3 enter “n” (new partition), then “p” (for a primary partition), then “2″ (for the second partition), then accept the defaults for the start and end cylinders.
- Enter “p” to make sure that both of your partitions have been created. If they have not, make sure you have unmounted all of the existing partitions and add any missing partition according to #7 and/or 8 above.
- Enter “w” to write the partition table, then “q” to quit.
- Create filesystems on the new partitions:
- sudo mkfs.vfat /dev/[first partition device number]
- sudo mkfs.ext3 /dev/[second parition device number]
- If any of the new partitions are mounted, unmount them (see #2 above).
- Put the MicroSD card and battery back into your Freerunner and close it up.
**Step 2: Download the firmware image files
**
Android requires three image files: the kernel, the root filesystem, and the bootloader.4 For now, the best kernel and rootfs images to use are those packaged by a developer named Sean McNeil. The latest files can be found here. I provide links to the existing images below, but the filenames may change. The Qi bootloader image is packaged by a user named Andy and is available here (for Android, use the file that begins “qi-s3c2442-”). Again, the names and locations of these files may change as development progresses, so if these links break, just seek out the most recent files.
- Download the kernel
- Download the root filesystem
- Download the Qi bootloader
**Step 3: Download and set up the “neotool” flash utility and dfu-util
**
NeoTool is a handy, lightweight graphical tool for flashing images to your Freerunner’s memory. It uses a command-line utility called dfu-util to do this, so you’ll need that too.
- Download the NeoTool script (this is just a text file, so you may want to right-click and “Save Link As…”)
- Download dfu-util
- Make both files executable—from the command line, navigate to the directory where you downloaded them and enter: chmod +x neotool dfu-util
- Run NeoTool—in the same directory, enter: sudo ./neotool
- In the NeoTool menu, select “Setup NeoTool”, then “Locate dfu-util”. Find dfu-util on your drive and click “OK”. Click “OK” again to return to the main NeoTool menu.
Step 4: Flash the images to your Freerunner with NeoTool
Now we will load the images into your Freerunner’s memory.
- Make sure your Freerunner has a decent charge in its battery, is turned off, and is disconnected from your PC.
- Boot the Freerunner into its NOR boot menu: while holding down the AUX (side) button on your Freerunner, press and hold the power button until a menu appears.5
- Attach the Freerunner to your PC via USB.
- From the NeoTool menu, select “Flash your Neo”.
- Select “Root-Filesystem”, “Kernel”, and “Bootloader” from the list.
- NeoTool will ask you to locate the image file for the Root FS first. Locate the file (androidfs.jffs2) on your drive, select it, and click “OK”.
- Next, do the same for the kernel (uImage-android).
- Next, do the same for the Bootloader (NeoTool will ask you for UBOOT even though we are using Qi).
- Click “OK” through the scary message.
- Wait for NeoTool to finish flashing the firmware (you can follow the progress in the terminal from which you started NeoTool).
- When NeoTool has finished doing its thing, press the AUX button on your Freerunner until “Power off” is highlighted. Press the power button to select it and power down your Freerunner.
- Unplug your Freerunner from USB power.
Step 5: Boot into Android
- Hold down the Freerunner’s power button until the screen’s backlight turns on (the screen will still be black) and then for a few seconds more.
- Release the power button and wait for Android to load.
- Android loads! Hurrah! This is way better than Om2008! It found my network! Calling works!
- Oh look, it’s going into suspend. Wait, why does it look like nuclear winter? Why is the screen white? Why doesn’t the power button do anything? I guess I’ll take out the battery. (NB: suspend doesn’t work yet.
)
I hope this helps someone. Feel free to send/post feedback.
- Despite the Freerunner’s agonizing early history, there is still a very active community developing and testing the platform, and though none of the many distributions available for the platform are ready for primetime, that community has actually accomplished a lot. Unfortunately, relatively little effort is dedicated to “bringing up the rear,” i.e. explaining clearly to less sophisticated users how to do all of the fun stuff the hardcore developers are doing. Sean McNeil’s kernel and filesystem images go a long way toward making Android accessible to the average user, but his instructions for installing them do not work for me, and I couldn’t find any that did. I pieced together these from 3 or 4 different sources, none of which contained the whole answer. I hope they’ll be useful to someone.
 ](http://www.copiesofcopies.org/webl/?p=34#identifier_0_34)]
 - When I mounted the MicroSD card using an SD adapter, it mounted as /dev/mmcblk0 and I unmounted the drives using: sudo umount /dev/mmcblk0p*. When I used a USB adapter, it mounted as /dev/sdb and I unmounted the drives using sudo umount /dev/sdb*. Yours may mount differently. Be careful that you have correctly identified the SD card and not some other more important drive on your computer. ](http://www.copiesofcopies.org/webl/?p=34#identifier_1_34)]
- Again, you may need to unmount the first partition before you can do this. ](http://www.copiesofcopies.org/webl/?p=34#identifier_2_34)]
- Supposedly you can use the default bootloader, u-boot, to load Android if you modify its environment to allow for larger kernels. I tried this several times and was unsuccessful. I have had no issues using Qi and it is reportedly faster. ](http://www.copiesofcopies.org/webl/?p=34#identifier_3_34)]
- This menu will only be displayed for 30 seconds, and then the phone will turn off again. If this happens before you begin flashing the firmware, just repeat this step. ](http://www.copiesofcopies.org/webl/?p=34#identifier_4_34)]
Link nguồn : http://www.copiesofcopies.org/webl/?p=34
Con này vọc sướng thật, nhưng flash trên win hơi khó, mình làm mãi chưa được, bác nào có hướng dẫn trên win đi cho a e tự sướng. Máy nhà mình ngốn pin kinh khủng, có lẽ do bản rom này chưa ngon
Mình chưa vọc đc cái gì nè :-s, chơi trên winxp khó quá các bác ạ, nó toàn hưỡng dẫn cho Linux hay là Mac híc híc
OK
Chúng ta sẽ co buổi off chào năm mới nhé, thời gian là chiều 17h thứ 6 - 06/02/2009 hoặc 16h00 ngày thứ 7 - 07/02/2009, Địa điểm là Cafe số 27 Trần Đại Nghĩa. Anh em tham gia vào đăng ký nhé.
Thanks!!!
Kính gửi toàn thể anh chị em dùng OpenMoko tại Hà Nội.
Theo nguyện vọng của một số anh/chị/em dùng OpenMoKo tại Hà Nội, chúng ta sẽ có một buổi off đầu năm về Neo OpenMoko:
Nội dung:
- Trao đổi cách dùng Neo OpenMoko
- Trao đổi cách thức kết nối của Neo với Mac OS, Win, Linux…
- Trao đổi Rom và các cách Up rom
- Chia sẻ phần mềm và …
Thời gian:
17h00’ thứ 6 - 06/02/2009 hoặc 16h00’ ngày thứ 7 - 07/02/2009
Địa điểm:
Cafe số 27 Trần Đại Nghĩa (Gần đường Lê Thanh Nghị - Đại học Bách khoa Hà Nội)
Kính mời anh/chị/em dùng Neo OpenMoko tham gia và đăng ký trực tiếp tại đây theo form:
Name:
Nick (Yahoo, gmail…):
Điện thoại:
Mọi chi tiết xin liên hệ
Trần Hồng Phương - mr.tranphuong@yahoo.com - 0989353443
Nguyễn Văn Cảnh - 0936.63.64.65 - YM: dragon_tudvn
Mail: canh.mecvn@gmai l.com
Web: http://www.mechanic.com.vn
[size=6]Happy New Year!!![/size]
Em đăng ký luôn ^^! đây ạ
Name: Kevin
Nick (Yahoo, gmail…): yahoo : kevin.1803
Điện thoại: 01256.14.18.59 ( điện thoại em chả biết sao tiếng nó nhỏ lắm ).
Hẹn gặp anh em hôm off na. HAPPY NEW YEAR
À à, lúc nãy xem tiếp thì Koolu đang phát triển Android trên freerunner, các bác xem sao : http://freerunner.android.koolu.com/release-files
Em Neo FreeRunner hỗ trợ thẻ nhớ max là bao nhiêu vậy các bác, trên web wiki nó ghi là 8gb, ở web khác nó lại ghi là 16gb ![]()
Mình đăng ký 01 suất. dt: 0904012328 từ hom mua đến giờ chưa flash được tức quá. Trên win nó vướng thằng usb nên khó sài. Con này chơi ngang BB đây
^^ Tớ chưa thử BB, Trên win nó vướng usb bắt phải cài plug phải ko, vướng cái bước này khổ quá :((.Bác Dragon, hôm nào rảnh viết 1 bài up rom trên winxp nha bác ^^. Ăn tết vui vẻ ạ :P, bác nào rảnh nữa thì… cài hộ em hihihi
6 hoặc 7 tết là sao bác Phương nhỉ? chốt 1 ngày nào đi, mồng 6 tết cũng được. E sẽ ra HN đúng giờ:D